
You can keep your suction strong by following these steps on how to clean the shark vacuum using only water and a soft cloth. This routine maintenance task takes about 20 to 30 minutes to complete, excluding drying time. It’s a medium-difficulty job because you must ensure every part is bone-dry before reassembly to avoid motor damage. You’ll need a clean, dry space to lay out the parts and access to the official Shark user manual for your specific model to identify the correct filter locations.
Necessary items for maintenance
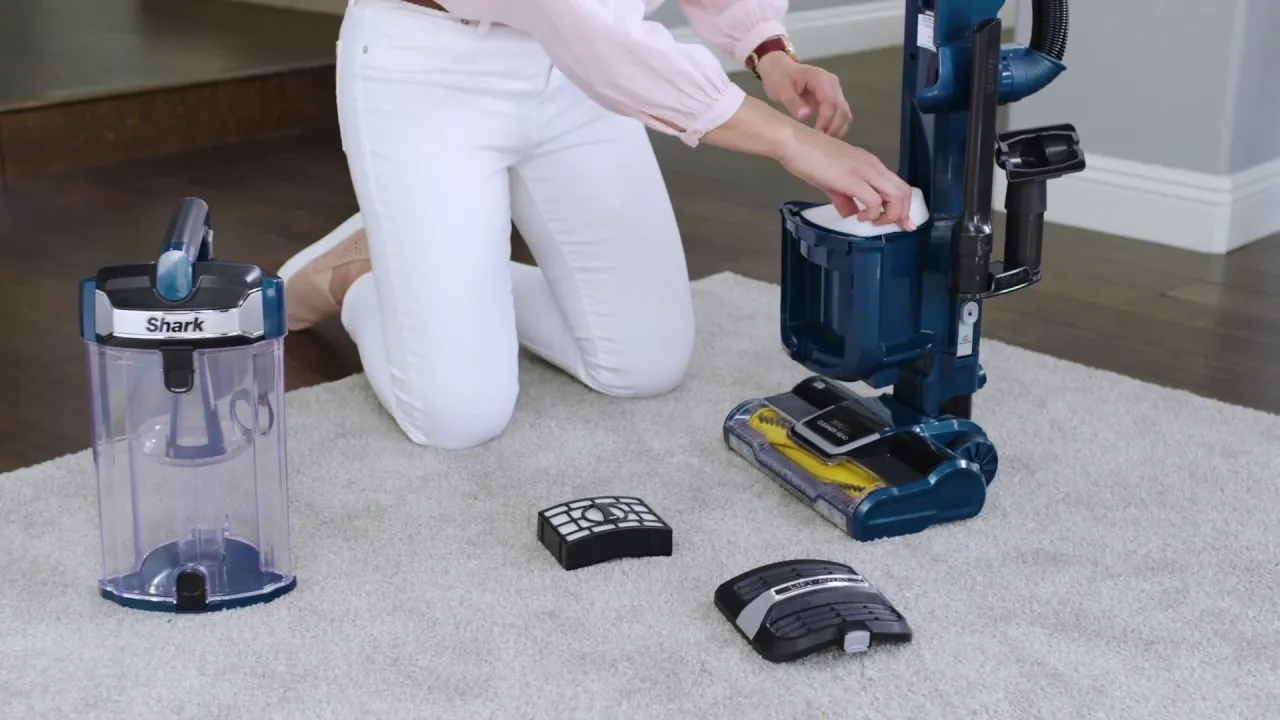
You should gather these items before starting your cleaning session to keep the process efficient. Using the wrong cleaning agents can damage the plastic components or the filter materials. Avoid harsh chemical sprays or ammonia-based cleaners, as these cause micro-cracking in high-impact plastics over time.
| Item | How much | Why it’s needed | A substitute |
|---|---|---|---|
| Lukewarm water | 1 basin | Rinsing dust from filters | None — don’t swap |
| Soft microfiber cloth | 1 piece | Wiping down the body | Clean cotton rag |
| Soft-bristled brush | 1 brush | Removing debris from rolls | Old toothbrush |
| Scissors | 1 pair | Cutting hair off rollers | Seam ripper |
| Drying rack | 1 area | Air drying all parts | Clean dry towel |
If you notice a mildew odor after cleaning, your filters were likely reinstalled while still damp. Wait at least 24 hours before reassembly to ensure total moisture evaporation. If you live in a high-humidity climate, point a small desk fan at the drying rack to cut that wait time in half. Always inspect the brush roll bearings for grit before replacing them; if they feel stiff, a single drop of silicone lubricant saves the motor from premature burnout.
Preparation before you begin
Always unplug the vacuum from the wall outlet before you start to prevent any risk of accidental activation. If your model features a battery pack, remove it entirely to ensure no stray current can engage the motor during maintenance.
Empty the dust cup completely into a trash bin, ensuring you tap the sides to release trapped dust and debris. Clear a large, flat surface like a kitchen table or countertop to organize the parts as you remove them.
Check your specific model documentation to locate the pre-motor and post-motor filters, as these vary by unit. If your vacuum uses a HEPA filter, look for a small arrow indicating the airflow direction; marking this with a pencil ensures you reinstall it correctly.
Never use soap, detergent, or harsh chemicals on the filters. These agents leave residues that trap dirt and clog the airflow permanently. If the filter remains gray after a rinse, replace it rather than scrubbing.
Step-by-step cleaning process
- Remove the dust cup by pressing the release button and lifting it away from the vacuum body, then empty the contents into your trash can.
- Open the dust cup lid and wipe the interior with your damp microfiber cloth to remove any fine dust stuck to the plastic walls.
- Locate the pre-motor foam and felt filters by opening the top cover of the vacuum unit, then pull them out gently with your fingers.
- Rinse the foam and felt filters under lukewarm water until the water runs completely clear, which usually takes about 2 minutes of continuous rinsing.
- Squeeze the filters gently to remove excess water, but don’t wring them out, as this can tear the delicate material and ruin the seal.
- Let the filters air dry for at least 24 hours in a well-ventilated area, ensuring they are 100% dry before you put them back inside.
- Use your scissors to carefully snip away any hair or threads wrapped around the brush roll, moving slowly to avoid cutting the bristles.
- Brush away any remaining dirt from the brush roll housing using the soft-bristled brush, then wipe the exterior of the vacuum with a damp cloth.
- Reassemble the vacuum by sliding the dry filters into their slots and clicking the dust cup firmly back into its original position on the unit.
Signs of success and maintenance needs
When the vacuum is clean, you’ll notice a visible improvement in suction power and a reduction in the noise level during operation. The filters should look clean and free of grey or brown discolouration. If you notice a persistent musty smell after cleaning, it often means the filters weren’t left to dry for the full 24 hours. A second cleaning round is necessary if the suction remains weak despite the filters appearing clean. In this case, check the hose for hidden blockages by shining a flashlight through the tube.
If you see debris, use a long, blunt object to carefully push the obstruction out. Never use sharp metal tools to clear the hose, as you might puncture the material and lose suction permanently. If the vacuum still lacks power after clearing the hose and cleaning the filters, the issue may be a mechanical failure that requires professional repair.
Troubleshooting common cleaning issues
| What happened | Why | What to do |
|---|---|---|
| Musty smell | Damp filters | Allow more drying time |
| Low suction | Clogged hose | Remove blockage manually |
| Brush not spinning | Tangled hair | Cut hair with scissors |
| Dust cup leaks | Loose seal | Reseat the cup properly |
| Motor shuts off | Overheating | Clean filters and vents |
If your machine emits a musty odor even after cleaning, check the foam filter for trapped moisture. Filters often feel dry on the surface while remaining damp inside. If the filter is cold to the touch, it needs another twelve hours of airflow.
When suction drops suddenly, check the hose for coins or hairballs first. Use a broom handle to push debris through rather than pulling it back out. This prevents sharp objects from tearing the internal lining.
If the motor cuts out during heavy use, you have likely tripped the thermal safety switch. Wait thirty minutes for the unit to cool completely before restarting. If the motor shuts off again within five minutes, the internal sensors are failing and require professional inspection. Never bypass these safety triggers to finish a job.
How often to clean the shark vacuum
You should clean your vacuum filters based on your specific usage patterns rather than a set schedule. The frequency depends on how often you vacuum and the conditions of your home, so always consult your owner’s manual for the authoritative guidance on maintenance intervals.
Frequently asked questions
How do I know if my shark vacuum filters are dry enough?
The filters are dry enough when they feel completely light and soft to the touch with no cold spots or dampness remaining. If you press the foam filter and see any water bead up or feel moisture, it needs more time to air dry. Never put a damp filter back into the vacuum, as this will trap moisture inside the motor housing and lead to mold or electrical failure.
Can I use a hair dryer to speed up the drying process?
You should never use a hair dryer or any heat source to dry your filters, as the intense heat can melt or warp the filter material. This damage ruins the seal, allowing dust to bypass the filter and enter the motor, which causes permanent damage. Always stick to natural air drying in a ventilated room for at least 24 hours to ensure the filters stay in perfect condition.
Why is my shark vacuum losing suction after I cleaned it?
The most likely reason for lost suction after cleaning is that the filters weren’t inserted correctly or the dust cup isn’t clicked fully into place. Check that all seals are lined up and that the dust cup is snapped firmly into the vacuum body. If the suction is still poor, inspect the hose for any small objects that might have been sucked up and are now blocking the airflow.
Is it safe to wash the brush roll with water?
It isn’t safe to wash the brush roll or any motorized floor nozzle with water, as this will damage the electrical components and the motor. You should only use a dry cloth or a soft brush to remove hair and debris from the roller. If you get water inside the electrical connections, it can cause a short circuit or rust, which isn’t covered by the manufacturer’s warranty.
How do I remove stubborn hair from the brush roll?
You can remove stubborn hair by using a pair of scissors to carefully cut along the groove of the brush roll while rotating it by hand. Once the hair is cut, use your fingers or a soft brush to pull the pieces away from the bristles. Take your time during this step to ensure you don’t accidentally cut the rubber belt or the bristles themselves, which would reduce the cleaning efficiency.
Does it matter which way the filters go back in?
It matters because the filters are designed with a specific shape to fit only one way into the housing to ensure a proper seal. Look at the edges of the filter and the shape of the compartment to align them correctly before pushing them into place. If you have to force the filter, it’s likely backwards or upside down; stop and recheck the orientation to avoid damaging the plastic frame.
What happens if I use soap to clean the filters?
Never use soap or detergent on the filter, as residue blocks airflow and causes motor overheating. Use only plain, lukewarm water to rinse the material. This keeps the filter porous and ensures your vacuum maintains optimal suction power throughout its lifespan.
Conclusion
Once everything is perfectly dry, snap the pieces back into place and listen for that satisfying click. Your machine shouldn’t smell musty or struggle with dust anymore. Since you’ve already got the hang of this, try setting a calendar reminder for three months from today so you don’t forget your next deep clean.