
To remove the roller brush from your Shark Lift-Away vacuum, you must first disconnect the power, flip the floor nozzle over to locate the access door, and use a flat-head screwdriver or a coin to unlock the latches that secure the brush roll cover. This process allows you to perform routine maintenance, such as clearing hair wraps or debris that prevent the agitator from spinning efficiently during your cleaning sessions.
Key Takeaways
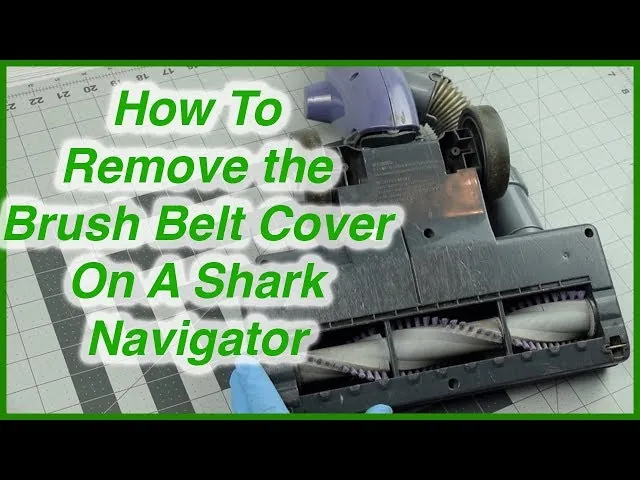
- Always unplug your vacuum from the power source before attempting to touch the brush roll to prevent accidental activation.
- Most Shark Lift-Away models feature a brush roll access door located on the underside of the floor nozzle.
- Regularly removing hair and fiber buildup extends the lifespan of your belt and motor.
- Use a pair of scissors or a seam ripper to carefully cut away tangled hair without damaging the bristles.
- Ensure the access door is locked firmly back into position before reconnecting the power.
Why Should You Remove The Brush?
Cleaning the brush roll is essential for maintaining the suction power of your vacuum. Over time, long hair, carpet fibers, and stray threads wind tightly around the roller, creating friction. This added resistance forces the motor to work harder, which can lead to overheating or premature wear on the drive belt. By periodically removing the roller or cleaning it in place, you ensure that the vacuum maintains optimal airflow and picks up debris effectively on both carpets and hard floors.
Preparing Your Shark Vacuum Safely
Before you begin, safety must be your priority. Disconnecting the vacuum from the wall outlet is the most important step to avoid injury. Once unplugged, place the vacuum unit in a stable location, such as a workbench or a flat floor area with good lighting.
If your model has a detachable floor nozzle, it’s often easier to remove the nozzle entirely from the wand to gain better access to the underside. Lay the nozzle flat on its back so the roller brush is facing upward and is clearly visible.
Identifying Your Specific Shark Model
Shark produces several variations of the Lift-Away series, including the Navigator, Rotator, and Apex lines. While the core mechanism for removing the brush roll is similar, the specific fasteners can differ. Some models utilize a simple sliding latch, while others require a coin to turn a locking screw. Understanding your hardware prevents you from forcing a latch that might be designed to slide rather than pivot.
| Model Series | Fastener Type | Typical Tool Required |
|---|---|---|
| Navigator Lift-Away | Screw Latch | Flat-head screwdriver or coin |
| Rotator Lift-Away | Sliding Tab | None (manual operation) |
| Apex Lift-Away | Removable Door | Coin or fingertip latch |
| DuoClean Models | Dual Access | Coin for side panel |
How to access the Shark Lift-Away roller brush
Once you have located the access panel on the bottom of the nozzle, look for the markings that indicate “locked” and “unlocked” positions. If your model uses a screw-style fastener, insert a coin or a flat-head screwdriver into the slot and turn it counter-clockwise until it clicks into the open position.
If it’s a sliding tab, push the tab away from the center of the brush roll. Carefully lift the panel away from the nozzle, being mindful of any plastic clips that might be fragile.
Pro Tip: If the access panel feels stuck, don’t force it; check for hidden debris or a secondary latch that might be holding the door tight.
Removing The Roller Brush Assembly
Once the cover is removed, you’ll see the brush roll resting in its housing. On many models, one side of the roller is held by a small bracket or a belt loop. You may need to gently lift the left side of the brush roll—the side opposite the belt—first.
Once that end is free, slide the brush roll out of the belt loop or the drive gear on the right side. Be careful not to lose any small bushings or washers that might be located on the ends of the roller, as these are critical for the smooth rotation of the part.
Cleaning The Bristles And Housing
With the roller removed, use this opportunity to clean the entire nozzle housing. Debris often collects in the corners of the housing where the brush roll sits. Use a soft cloth or a dry brush to wipe away dust and fine particles.
For the brush roll itself, use a pair of scissors to cut through hair wraps. Always cut parallel to the brush roll to avoid snipping the actual bristles. If the roller is heavily soiled, you can wipe it down with a damp cloth, but ensure it’s completely dry before reinstalling it.
Inspecting The Drive Belt
While the brush roll is out, take a moment to inspect the drive belt. The belt should be tight, free of cracks, and shouldn’t show signs of fraying or melting. If the belt is loose or damaged, the brush roll won’t spin even if the motor is running.
If you notice signs of wear, this is the time to order a replacement belt from the manufacturer. Replacing a worn belt while you have the unit disassembled is significantly easier than waiting for it to snap during a future cleaning session.
Reinstalling The Roller Brush
To put the vacuum back together, reverse the steps you took during removal. Slide the brush roll back into the drive gear or loop the belt around the end of the roller first.
Once the belt is seated, push the other end of the brush roll into its housing bracket until it clicks or sits firmly in place. Ensure the roller spins freely by hand before you attempt to replace the cover. If it resists, it’s likely misaligned or the belt is twisted.
Securing The Access Door
After the brush roll is seated, replace the access cover by aligning the tabs with the slots in the nozzle housing. Press down firmly to ensure the door is flush with the base. If your model uses a screw fastener, turn it clockwise with your coin or screwdriver until it’s locked.
If your model uses a sliding latch, push the tab back into the locked position until you hear an audible click. A loose door can cause rattling during use or result in poor suction.
Troubleshooting Common Brush Issues
If your roller brush still doesn’t spin after cleaning, check for these common issues:
- Obstruction: Verify that no small objects like coins or hair ties are jammed between the brush roll and the housing.
- Belt Failure: If the belt is loose, it might have stretched or slipped off the motor pulley.
- Sensor Tripping: Some models have a safety sensor that stops the brush roll if it detects a jam; ensure everything is clear and restart the vacuum.
- Electrical Connection: Ensure the floor nozzle is properly clicked into the wand, as a poor connection can cut power to the brush motor.
| Issue Type | Potential Cause | Immediate Fix |
|---|---|---|
| No Spin | Hair wrap | Cut hair with scissors |
| No Spin | Stretched belt | Replace drive belt |
| Noisy Spin | Worn bushings | Clean or replace bearings |
| Low Suction | Loose access door | Realign and lock door |
Maintaining Your Vacuum Long Term
To minimize the frequency of having to perform this deep cleaning, try to pick up large debris by hand before vacuuming. Avoid vacuuming over thick fringe rugs or long, loose cables, as these are the most common culprits for brush roll jams.
Regularly wiping down the underside of the floor nozzle with a microfiber cloth can also prevent the buildup of fine dust that eventually leads to the roller becoming sluggish. Keeping the brush roll assembly clean ensures that your vacuum remains a reliable tool for years.
Warning: Never attempt to wash the brush roll or any internal vacuum components with water unless the manual explicitly states that the part is washable, as trapped moisture can cause mold or damage the motor.
Frequently Asked Questions
Can I run my Shark vacuum without the brush roll?
You can technically operate the vacuum without the brush roll, but it will be significantly less effective at picking up debris from carpets. The brush roll is designed to agitate carpet fibers to release dirt, which the suction then pulls into the canister. Without it, you’re relying solely on airflow, which is generally insufficient for deep cleaning carpets or rugs.
How often should I clean the brush roll?
You should inspect the brush roll for hair and debris every three to four weeks, depending on how often you vacuum and whether you have pets. If you notice a decrease in performance or if the vacuum makes an unusual high-pitched sound, check the roller immediately. Frequent, light maintenance is much easier than dealing with a completely jammed brush roll that stops spinning.
What if I can’t get the brush roll out?
If the brush roll feels stuck, don’t force it, as you could snap the plastic housing or the brush roll itself. Check for hidden debris that might be acting as a wedge, or ensure that you have fully disengaged the locking mechanism. Some models require you to push the roller to one side to clear the mount before lifting. Check your manual for specific model-side release instructions.
Will removing the brush roll void my warranty?
Performing routine maintenance, such as cleaning the brush roll, is generally expected by manufacturers and shouldn’t void your warranty. However, you should avoid disassembling the motor housing or electrical components, as this can certainly void your coverage. Stick to the parts that are intended to be accessible for the user, such as the brush roll, filters, and the floor nozzle access panel.
Can I replace the brush roll myself?
Yes, replacing the brush roll is a straightforward repair that most owners can perform at home. You can purchase replacement brush rolls directly from the manufacturer or authorized parts retailers. Ensure you have the exact model number of your vacuum when ordering to guarantee that the replacement part is compatible with your specific floor nozzle, as Shark uses different dimensions for various models.
Conclusion
Ensuring your vacuum’s brush roll is clean and free of obstructions is a simple task that significantly improves your home’s air quality and floor cleanliness. By following these steps, you maintain the mechanical integrity of your machine and avoid costly repairs. For your next cleaning session, take a moment to inspect the entire nozzle assembly to ensure everything is working as intended.